ART STUDIO SECRETS
As artists we each gather a unique array of tips, techniques, and inspirations throughout our careers. Here are some of my “Art Studio Secrets” from my books and some new and expanded ones. I invite you to share some of your discoveries here, too. Post your feedback in the comments.

Search
Events and Happenings

Kleo Kats Prints Are Available for the First Time!

After receiving many inquiries, we have canvas prints, posters, metal prints, and more of all eight Kleo Kats available here, at Fine Arts America

Click on Audubon below and it will bring you to his page. From there you can find each of the other Kleo Kats. Please visit and let us know how it goes.

Photography Prints


Gallery Exhibit

See my latest works in the Hidden Treasures series. Showing
June 24
and extended through
 
December 1, 2014
at the
Judith Kaufman Gallery in the 
Historic El Portal Theatre
5269 Lankershim Blvd.
North Hollywood, California 

Learn More > 

Connect with Marjorie
Award Winning Best Seller

Winner of Two Awards at the inaugural Dan Poynter Global eBook Awards!

Best Art/Graphics eBook
Non-Fiction
Best eBook Cover
Non-Fiction

151 Uncommon and Amazing Art Studio Secrets

84 pages, black and white

Buy Now – Choose Format
$7.99 Paperback
$2.99 Kindle, Nook, or iBook


ALL NEW!

151 Effective and Extraordinary Art Studio Secrets

110 pages, black and white

Buy Now – Choose Format
$7.99 Paperback
$2.99 Kindle, Nook, iBook


NEW!

210 Imaginative Ideas for Painting

166 Pages

Buy Now – Choose Format
$10.95 Paperback
$4.95 Kindle, Nook, iBook


Get “Art Studio Secrets” in Your RSS Reader
Navigation

Entries in painting (5)

Friday
Jun062014

Getting White to Work

What do snow, lilies, clouds, teeth, whipped cream, and polar bears have in common? If you said the color white, you’re wrong. Each is a pale color with only highlights that are truly white.

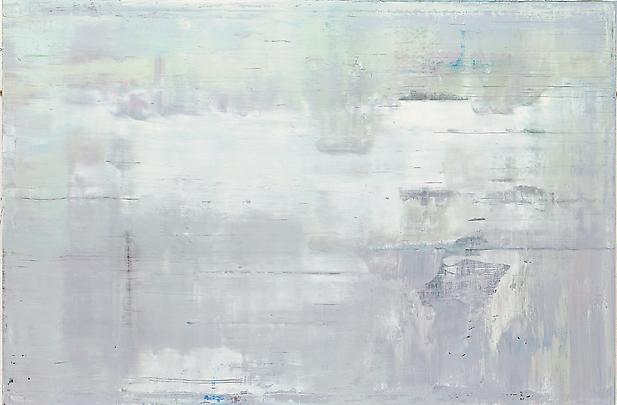
This work shows the temperature and value range of the color white. Gerhard Richter, Abstract Painting (911-2), 2009, 78 3/4 in. x 118 1/8 in., Courtesy of Marian Goodman Gallery, New York. (Click on painting for link.)

When painting a white object observe that it often has warm color tints in the light with cool tones in shadow. White things pick up color reflections from their surroundings, too. They're more colorful than first meets the eye.

Which White is Right?

White is essential for every palette of colors. The more opaque the white, the greater its tinting power but the more it will diminish the vibrancy of a color. White also tends to cool a color.

Here are popular whites for oils, acrylics, and watercolors and an outline of their differences.

  • Titanium White: opaque, warm, dries slowly, slightly flexible
  • Zinc White: transparent, cool or neutral, dries slowly, brittle. It's often preferred for mixing because it doesn't overpower a hue. Good for glazing and scumbling techniques
  • Titanium-Zinc White or Mixing White: neutral, all-purpose, combines the best of two pigments. Try mixing your own formula
  • Flake White: warm, dries slowly, flexible, contains toxic lead. Avoid it.
  • Flake White Hue: flake white without the toxic lead
  • Transparent White: weakened titanium formula, good for mixing
  • Chinese White: term used for zinc white watercolor formulas
  • Gamblin Radiant White (oil only): neutral, brilliant light reflective quality
  • Bob Ross Soft White (oil only): wonderful creamy texture 

TIP: Add a bit of cadmium orange to white for a sunlit feeling. Use it against cool shadow tones to heighten drama, especially in a landscape.

EXERCISE: Making It All White  Try creating a painting in high key (light values.) You'll become aware of subtle value and temperature relationships. Add brighter colors and darker accents sparingly. Create texture for excitement. A "white" palette produces a unified piece with harmony and appeal. 

*

When painting with white, you're working with color—however light. And if you make textural brushstrokes, you're creating shadows too, which provide more color and values. White is anything but sterile; it's colorful and dynamic.

Monday
Feb112013

The Still Life: Still Lively  

Here's a photograph of a possible still life setup. Old and new items tell a cheerful story. Note the repeated circle shapes, analogous colors, and variety of sizes in the composition.
A  still  life  lets  you  express  the  vitality  of  painting  from  life  in  the  comforts  of your studio. Forget those boring vases you drew in art school. Set up whatever delights you. Simple  shapes  and  solid  colors are  easiest  to  portray,  but  there  are  no  rules.  Some suggestions:

  • Home: Kitchen  utensils,  framed  photos,  perfume  bottles, stuffed animals, even piles of laundry. The phrase, “doing your laundry” has a new meaning to an artist! 
  • Closet: Handbags of various shapes, a rainbow of scarves, sprawls of hangers, and vintage jewelry;
  • Yard: Rocks, muddy boots, rusty tools, and fallen leaves and fruit;
  • Found objects: Flea market and thrift store finds, broken or not, offer great shapes and stories;
  • Packaging: Cereal boxes, canned goods, board games, and more put words and designs into your statement;
  • Art supplies: Paintbrush bouquets, palettes, and paints are colorful props every artist has on hand;
  • Unexpected: Add  a  jolt  of  interest  to  a  traditional  still  life  with something  unexpected,  such  as  a  toy  robot next to vase of flowers

Composing a Still Life

A pleasing arrangement is the foundation of your artwork. Determine a vantage point (eye level or slightly above eye  level works well)  then arrange  things  on  a  flat  surface. Use a piece of cardboard, maybe draped with cloth  for a backdrop. For well-defined lights and shadows, use direct light from a window or lamp on your subject.

Play  with  the  placement  of  things,  arranging  overlaps  and  varying heights  and  sizes.  Contrast  your  darks  and lights, including shadows. Fabrics offer pattern accents. Use floral clay or earthquake gel to hold things in place. 

Have fun expressing your personal take on the classic still life!


Friday
Jan112013

Explore Your Natural Desire to Manipulate Materials

Kids’ Lap Tray For Artists – Inexpensive plastic lap trays from Michaels or Amazon are handy on a table near your easel. They elevate your palette, and hold brushes, books, and art materials, too. As artists the drive to express ourselves is especially strong. We also have a natural desire to manipulate materials for creating art. Here’s an assortment of techniques to try, and tips for managing materials.

Reviving Dried Acrylics

I learned the secret sauce for reviving gummy, almost-dry (not totally dry) acrylic paints: one part ammonia to 20 parts distilled water. Mix with a stirrer and store in a jug; keep a small batch handy in a plastic squeeze bottle. Add a drop or two directly into the tube or jar to liquefy the paint. I want to thank my friend Peggi who passed this along to me. After persistently inquiring about it, she learned this from a rep from one of the more well-known artists' paint manufacturers.

Do a Little Art

Tiny stretched canvases, 4” x 5” or less can make strong little statements. There’s something magical about miniatures. You can incorporate the canvases into larger artworks or create a mini series. Find them in craft stores along with diminutive display easels. Add paint smudges to the easels for a “little” authenticity.

Giant Palette Knives

Giant spatulas intended for frosting cakes are shaped like palette knives. They’re cheaper than art knives and are great for sweeping paint onto large surfaces.

Instant Airbrush

Try kids’ spray markers (Sprayza or Blo Pens) over watercolors or acrylics for instant airbrush effects. Coat sprayed color with acrylic medium to make the colors permanent and give them a painterly look.

A Yard of Help

Mahl sticks support your arm and steady your hand for painting details and more. A flat wood yardstick is inexpensive and works beautifully because it stays in place.

Try new materials on occasion to see what resonates with your personal expression.

Friday
Sep282012

Color Secrets

“In visual perception a color is almost never seen as it really is – as it physically is. This fact makes color the most relative medium in art.” – Josef Albers

Your color choices will greatly influence the viewer’s emotional reaction to your paintings. Remembering some general rules can help you express your ideas. 

“Audubon” from the Kleo Kats series, by Marjorie Sarnat

Know Your Relatives

Color is always relative. If a color is not working in your painting, adjusting the colors near it often solves the problem. For example, make a color appear brighter by surrounding it with duller colors. Surrounding areas have a profound effect upon the appearance of any color.

Keep It in the Family

A painting should have a dominant hue, with approximately ¾ in one color family. The remaining areas work well with complementary hues or another color temperature.

Brightening Up

Metallic acrylics mixed into acrylic white create gorgeous pastels that look non-metallic, but have a vibrant, less chalky hue than achieved by mixing flat colors into white. A bit of metallic color mixed into any flat color will intensify its hue, too.

Colors Have Character

When a painting has wonderful color harmony the palette usually has a common denominator, such as rich jewel tones, dusty pastels, or earth-tones. I call it the “character” of the colors.

Determine which colors express your visual statement. Gather or make color swatches, including discords and neutrals for accents. Name the group descriptively, such as “Sun-bleached” or “Etruscan.” A name helps you keep your colors’ character in mind as you paint. 

Pre-Mixed White Neutrals

Premix some warm and cool neutral whites so you have them ready for lightening a color. These whites will help keep your mixed colors rich. 

I keep gouache mixes in a small dish. When it dries out I add a bit of water, let it soak a few minutes, stir and use. You can keep acrylic mixes in airtight food storage containers. Add a drop of water now and then to keep the paint from drying out.

This is a great way to save white paint that is left on your palette, even if it has a bit of other color on it. Add it to your warm or cool premixes for future use.
(From “151 Uncommon and Amazing Art Studio Secrets,” Tip No. 93)

Black is Not the Absence of Color

Make rich, never-dull blacks by mixing burnt umber and ultramarine blue. This works for any kind of paint. Adjust the proportions to create warmer blacks (more umber) or cooler blacks (more blue).

The custom mixture makes gorgeous grays with white added. Adjust the warmth or coolness of the gray, as well. 

Replacing ready-made black paint with a custom mix will enliven your painting in subtle but important ways.
(From “151 Uncommon and Amazing Art Studio Secrets,” Tip No. 94)

Mixing Tip

When mixing a color, start with your lightest color and gradually add small amounts of the darker or brighter color to it so you don’t overwhelm it. This tip will save you a lot of paint.
Kid Friendly
(From “151 Uncommon and Amazing Art Studio Secrets,” Tip No. 95)

These rules and ways of handling color are tried and true guides that work for most cases. But in art and life, rules are meant to be broken. Let your own preferences be your final authority.

(Portions of this post originally appeared in the newsletter of the California Art League.) 

Friday
Aug172012

Six Tips for Painting Creatures’ Features  

I write a column for California Art League's newsletter called, coincidentally, "Art Studio Secrets." Here's a recent entry from the July issue.

1. Outside Rounds

When painting humans and creatures keep in mind that body parts, including facial features, have outside round curves. Your figures will appear more lifelike by following this principle. (See "Study for Madonna With The Yarnwinder" below.)

Leonardo Da Vinci knew the secret of drawing life: every contour is an outside round. In this drawing the curves are sometimes subtle and may appear to be concave, such as the chin line on the model’s right (our left). On careful examination it’s drawn by a series of outside rounds. (Image courtesy of www.leonardoda-vinci.org)

2. Bright Eyes

High contrast makes eyes appear shining and alive. When painting any eyes, use the darkest black in your painting in the pupil and the purest white for the highlight, placed side-by-side. Apply thick white in a horizontal stroke to catch light and enhance the effect. 

3. A Nose for Art

When painting noses, don’t put black inside the nostrils, even if they look very dark. Keeping nostrils lighter puts more focus on the eyes, optimizing emotional appeal.

4. Blushing Artist

Try real blush applied with cotton to put cheek color onto a watercolor figure. Blush blends easily and the colors are natural. A bit of blush on animals’ ears adds cuteness. 

5. Painting the Two-Lips

Lower lips usually catch more light than top lips; consider warm colors with yellow and white. The top lip usually has more shadow; consider warm neutrals with red. Use dark warm colors for linear shadows between lips. 

6. The Tooth Be Told

It’s difficult to make teeth look natural. If you must paint them, use white toned with gray violet and warm white for highlights. Paint teeth darker as they curve front to back, away from light. Keep shadows between teeth blurred and light.

Of course, these tips are generalities. Many factors influence style and color choices, and each painting requires its own expression.